Scenes
A scene is a single screen of your game, it can contain multiple actors and triggers. A game is typically made-up of many scenes connected together with triggers using the Change Scene event.
Adding a Scene
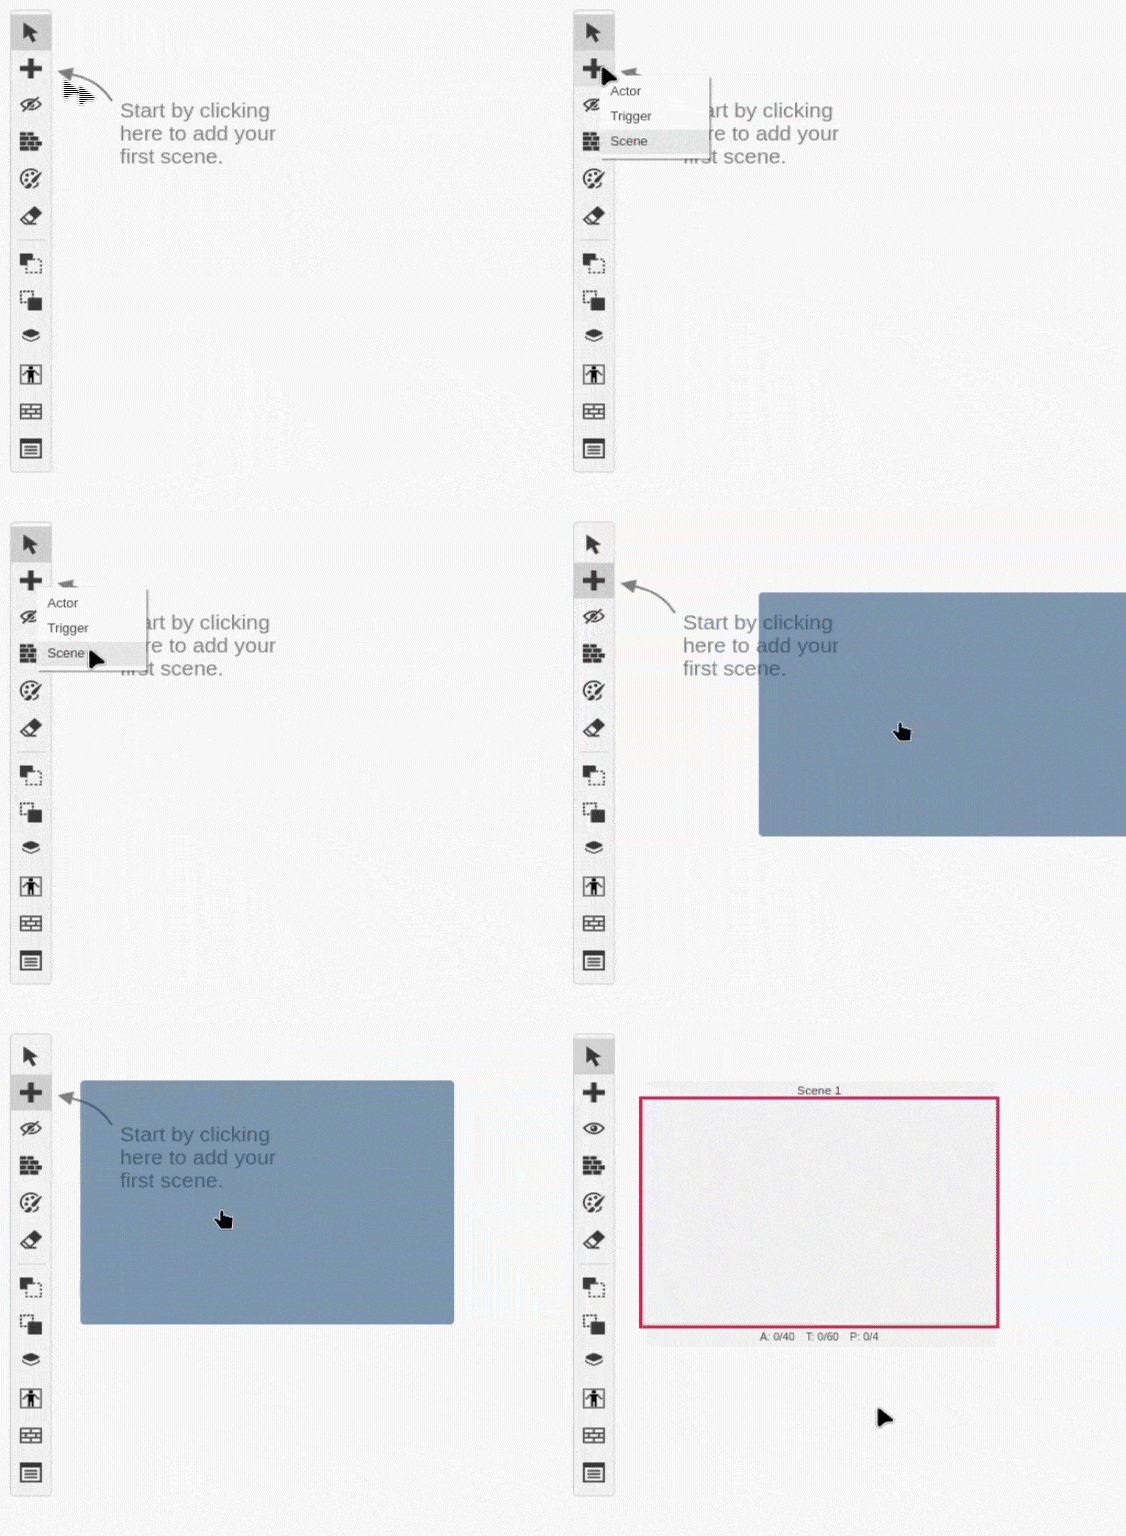
Click the button in the Editor Tools and select Scene from the menu. Click on any empty space in the Project Viewport to place the new scene.

You can use the Editor Sidebar to give your scene a name and a background from your project's assets. See the documentation for Backgrounds & Maps for more information on adding background images.
Scene Properties
- Name - The name of your scene. Useful for locating your scene with the search bar and scene navigator.
Using / characters in your scene's name will cause it to appear within folders in the scene navigator (e.g. ui/title screen will appear as title screen within the ui folder)
-
Resolution Mode - Lets you choose the size of your scene, H40 features
320pxwidth and224pxheight, H32 features256pxwidth and224pxheight. It's useful if you want to display splash screens but use less ROM space by having narrower images. -
BG Color (0 - 63) - Lets you choose the palette color index for the background, if you have automatic palettes it won't display on the editor.
-
Plane B (Background) - Lets you choose a backgrounds or maps file from the
assets/backgroundsfolder for the Background Layer. -
Plane A (Foreground) - Lets you choose a backgrounds or maps file from the
assets/backgroundsfolder for the Foreground Layer. -
Initial Palettes - If automatic is selected, the palettes will be selected based on the background and foreground files as well as the actors, if you select manual, you can attach up to four different palettes created on the Palettes view.
-
Force to Scene Size - This makes the scene render on the fixed resolution you selected on Resolution Mode instead of falling back to the Background or Foreground size, it's useful if you have scrolling backgrounds on the main menu or other UI scenes to have a cleaner editor.
Plane B (Background)
The Plane B (Background) is usually used for backdrops, distant scenery, or large static backgrounds.
It can also use the priority bit to appear in front of sprites if desired.
It can scroll independently of Plane A (both horizontally and vertically), make sure to review Backgrounds & Maps > Maps vs Images requirements, as parallax scrolling only works with images.
Plane A (Foreground)
The Plane A (Foreground) often used for HUDs, menus, text, or foreground scenery.
Plane A usually sits in front of Plane B, but sprites can appear in front of or behind depending on the priority bit.
It can also be used for parallax scrolling — giving the illusion of depth by moving at a different speed than Plane B, make sure to review Backgrounds & Maps > Maps vs Images requirements, as parallax scrolling only works with images.
Parallax Mode
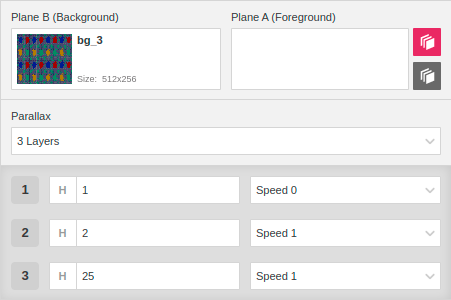
Clicking the button to the right allows you to turn on parallax mode (The top button is for Plane B (Background) parallax and the bottom button for the Plane A (Foreground) parallax) for the scene.
When parallax mode is enabled you can split the plane into up to three slices which can be modified to scroll at different speeds as the camera moves in game.
Be aware as noted on the Backgrounds & Maps > Maps vs Images section this only works with images and not with Tiled maps.

Palettes
The palette system allows for two different adjustments per scene.
- Automatic - The automatic mode picks the palettes based on the backgrounds or maps and actor sprites placed on the scene.
- Manual - The manual mode allows you to select four different palettes from the Palettes view that would be used on the scene.
Scene Scripts
Scenes can contain four different scripts.
-
On Start - This script will be called as soon as the scene is loaded in the game. You can use this to do things like playing music as the scene loads, configuring events to happen on button presses, initialise actors based on the values of variables, and much more.
-
On Update - This script will be called every frame before the Actor and Trigger On Update scripts, this can control most of your scene logic, like when to pause the game, or background effects, and much more.
-
On End - This script will be called as soon as the scene is unloaded in the game. You can use this to pause music, do a fade out, save score if needed, and much more.
-
On Pause - This script will be called instead of the On Update when the game is paused, you can place your pause update logic here.
To start building a script, select a scene, click the script type you want to edit and click the Add Event button in the Editor Sidebar to open the event menu. Select an event to add it to the script.
For more information see the documentation for Scripting.
Adding Collision to a Scene
Select the Collision Tool from the Editor Tools. There are 6 default collision types that can be added.
- Solid - Stops colliding actors from entering the tile on any side.
- Top/Bottom/Left/Right - Stops colliding actors from entering the tile from that specific side. This is useful for one-way collision and semi-solid platforms.
- Ladder (Tile type) - Allows you to check if an actor is on top of a ladder to allow moving up and down, you can check the Action Platformer example for a detailed usage.
Each tile can hold a maximum of 1 ladder and 3 collision sides. Adding 4 collision sides will replace the sides with a single solid block. Ladders will not replace existing collisions when placed on top of another collision.
Additionally there is a dropdown menu allowing you to view additional tile types:
- Tile Types - These tile types can be used to mark a tile with a specific type, then you can check if an actor overlaps a specific tile type with the If Actor Touching Tile Type event. This is featured on the Game - Inkventure example.
Changing Palettes & Priorities on a Scene
Select the from the Editor Tools. This allows you to change the default palette for the background and foreground layers as well as the tile priority.
For more information about the drawing mode used for the Colorize Tool and the Collision Tool, see Keyboard Shortcuts.
Changing Palettes
You can select from P0 to P3 for either background or foreground. After that you can click on the desired tiles.

This requires some testing as the final palette depends on the one you use on each layer.
For example, if the Plane A (Foreground) uses Palette 1, and you tick to use Palette 0, the result would still be Palette 1!
TODO improve, this behaviour is too weird ^^^^^
Tile Priority
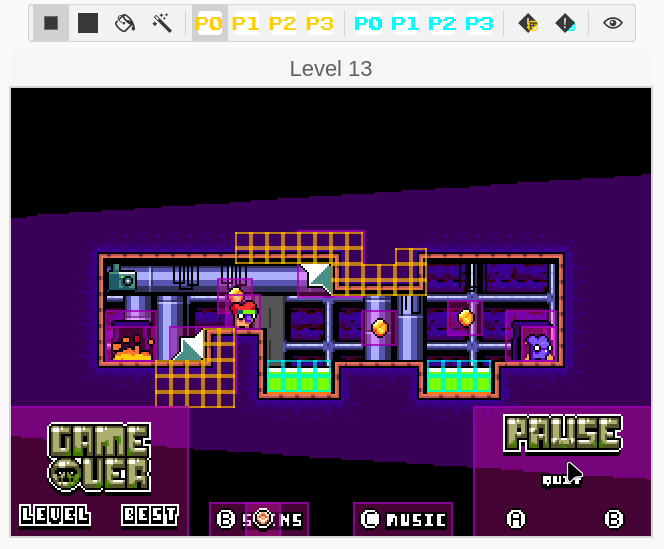
You can change the tile priority for either Plane B (Background) or Plane A (Foreground) from low-priority, the default one, to high-priority, these tiles will appear in front of actors allowing you to create depth in your scenes.
Select the from the Tool Bar to change the Plane B (Background) priority, and select the from the Tool Bar to change the Plane A (Foreground) priority.
The zones with high-priority will appear with a yellow or blue square respectively like in the next image.

Magic Brush
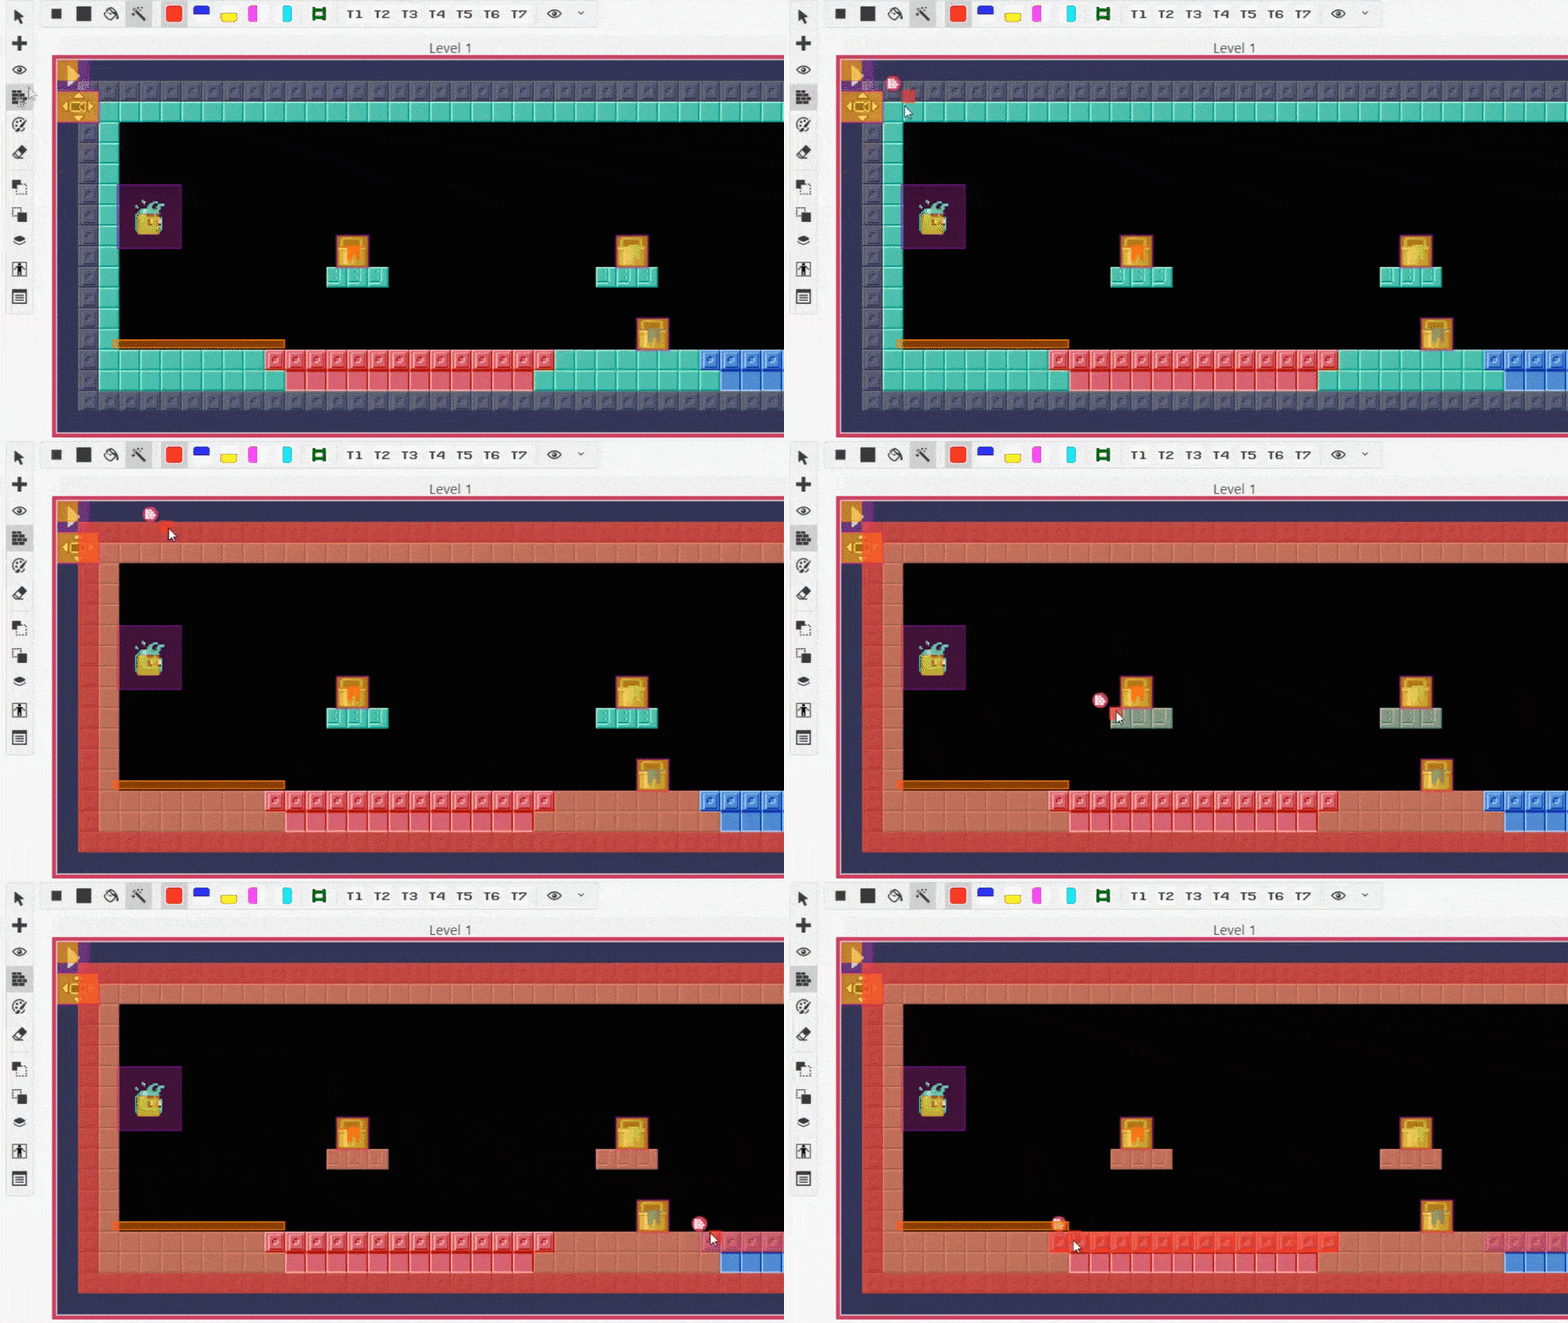
The Magic Brush is available when adding collisions, palette changes or priorities to a scene and can be used to paint every tile in the scene that matches the one you clicked instantly.

The magic brush uses the information on the background plane first, if not pressent then on foreground.
When the layer is a Tiled Map file it tries to use the information on the Background Layer.
Scene Limits
MD Engine uses per-scene limits to keep performance predictable
Each scene can have a maximum of 40 actors, 60 triggers and 4 palettes.
You can check this information by selecting a scene and looking for the gray bar under your scene that reads: A: 0/40 T: 0/60 P: 0/4. The letters on this bar represent the following:
A:represents the number of actors that the scene is using.T:represents the number of triggers that the scene is using.P:represents the number of palettes that the scene is using.
The actor and trigger limit is a recommendation, the game does build even if you use more!!
But we can't guarantee performance or that it even fits on VRAM or RAM.
Due to this we won't be reviewing support requests where the performance limits are by-passed.
Use at your own risk!
Actor Limits
Each scene can have a maximum of 40 actors.
Make sure to check the Hardware Sprite information, clustering too many actors together in a scene will cause some actors to become invisible in-game on real hardware or emulators. For Desktop Export you can avoid this with the Enhanced Mode.
Trigger Limits
Each scene can have a maximum of 60 triggers.
Background and Sprite Tile Limits
The engine by default has 1004 Background & Foreground Tiles, 420 Sprites Tiles, and 96 Font Tiles.
You can change these settings from the Settings section or use the VDP Tiles Setup event on the scene OnStart, or OnEnd.
You can use the VRAM Viewer in the Debugger to get a visual representation of how tiles are being used in each scene in your game.
Replicate Actor
You can replicate an actor, this will copy the actross acrss all created scenes in the game.
This has been created to make it easier to replicate UI across different levels.

