Backgrounds & Maps
Each scene can have two layers, one is called Plane B (Background) and the other is called Plane A (Foreground).
They can be either image files (.png) or Tiled map files (.tmx).
You can import the background with the button if you want to load the file as-is. You can also convert any PNG into MD Engine format with the button, for information regarding this you can check the Image Converter section.
You can also add backgrounds or maps to your game by including .png or .tmx files in your project's assets/backgrounds folder.
Image files can be loaded as Map or as Image, there are some restrictions to each file type that are outlined below.
Maps vs Images
You can use any image file as a map. Tiled map files are only supported for maps though.
| Action | Map | Image |
| Scroll Support | ✔️ | ❌* |
| Parallax Support | ❌ | ✔️ |
| Wrapping | ❌ | ✔️ |
| Streaming | ✔️ | ❌ |
* Images can scroll on either X or Y, but not both at the same time.
The Map resource type will be the preferred one in most cases.
If you don't know what to use it's recommended to use Map.
Images
Image Requirements
The image size must be multiple of 8px in both width and height.
If you add the sprite as-is, it must be an indexed .png file with a maximum of 64 colors.
Each 8x8 tile can only use colors from a single 16-colors palette.
If you are unsure about the color requirements you can always use the Image Converter.
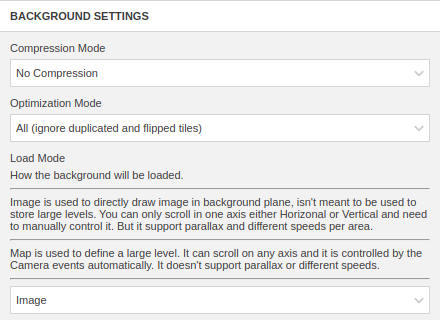
Image Settings
The image settings hold information related to how the image will be used when attached to a scene and how it will be stored in the ROM.

Compression Mode
This represents how the image is compressed when compiled into the ROM.
You have four different options:
- Best
- No Compression
- APLIB: good but slow, don't use it for streamed / animated stuff.
- Custom LZ4: average ratio but fast, recommended for streamed / animated stuff.
The best option if you are just starting is to use No Compression as depending on the image size and number of tiles there may not be enough RAM to uncompress it.
Optimization Mode
This represents how the image is optimized during the compile time.
You have three different options:
- No Optimization
- All: ignore duplicated and flipped tiles.
- Duplicate: ignore duplicated tile only.
The best option if you are just starting is to use All.
Load Mode
This represents how the image will be loaded when the scene opens. You have two different options, Image and Map.
You can check the main differences here.
Image Mode
This is used to directly draw images in the background plane and isn't meant to be used to store large levels. You can only scroll in one axis either Horizontal or Vertical and need to manually control it. But it supports parallax and different speeds per area.
Map Mode
This is used to define a large level. This option would be the same as using a Tiled map file.
It can scroll on any axis and it is controlled by the Camera events automatically. It doesn't support parallax or different speeds.
Maps
Map Requirements
The map must have the tileset embedded and not as a TSX file. TSX files are not supported.
The tileset must be placed on the assets/tilesets folder.
The route in the map must be relative to it and not absolute.
The tile size should be a multiple of 8, it's recommended to use 8px or 16px.
The best solution if you want to make new maps and edit them with Tiled Map is to create them inside MD Engine, then link the tilesets, save them and proceed to edit with Tiled Map.
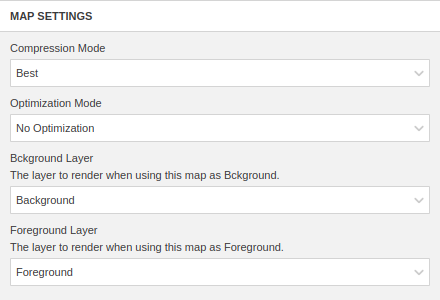
Map Settings
The map settings hold information related to how the Tiled map file will be used when attached to a scene and how it will be stored in the ROM.

Compression Mode
This represents how the image is compressed when compiled into the ROM.
You have four different options:
- Best
- No Compression
- APLIB: good but slow, don't use it for streamed / animated stuff.
- Custom LZ4: average ratio but fast, recommended for streamed / animated stuff.
The best option if you are just starting is to use No Compression as depending on the image size and number of tiles there may not be enough RAM to uncompress it.
Optimization Mode
This represents how the image is optimized during the compile time.
You have three different options:
- No Optimization
- All: ignore duplicated and flipped tiles.
- Duplicate: ignore duplicated tile only.
The best option if you are just starting is to use All.
Background / Foreground Layer
This represents what layer would be used when the map is attached on a Scene as either Plane B (Background) or Plane A (Foreground) layer .
Map Editor
MD Engine includes a simple map editor that can be used to create or edit Tiled map files, as well as to link tilesets to them.
More information about it here.
Using Tiled
Be aware when using Tiled Map directly! There are some restrictions that apply to the maps:
- You can't rotate tiles, only Horizontal or Vertical flips
- All tile on a layer must belong to the SAME tileset
- Only two layers can be used per map, if you have more they will be ignored

